Digital certificates for RPC connections
Decred components use X509v3 digital certificates for identity validation and to encrypt the communication between them (end-to-end)

By Marcelo Martins - September 15, 2018
1. Introduction Permalink
Decred components use X509v3 digital certificates for identity validation and to encrypt the communication between them (end-to-end).
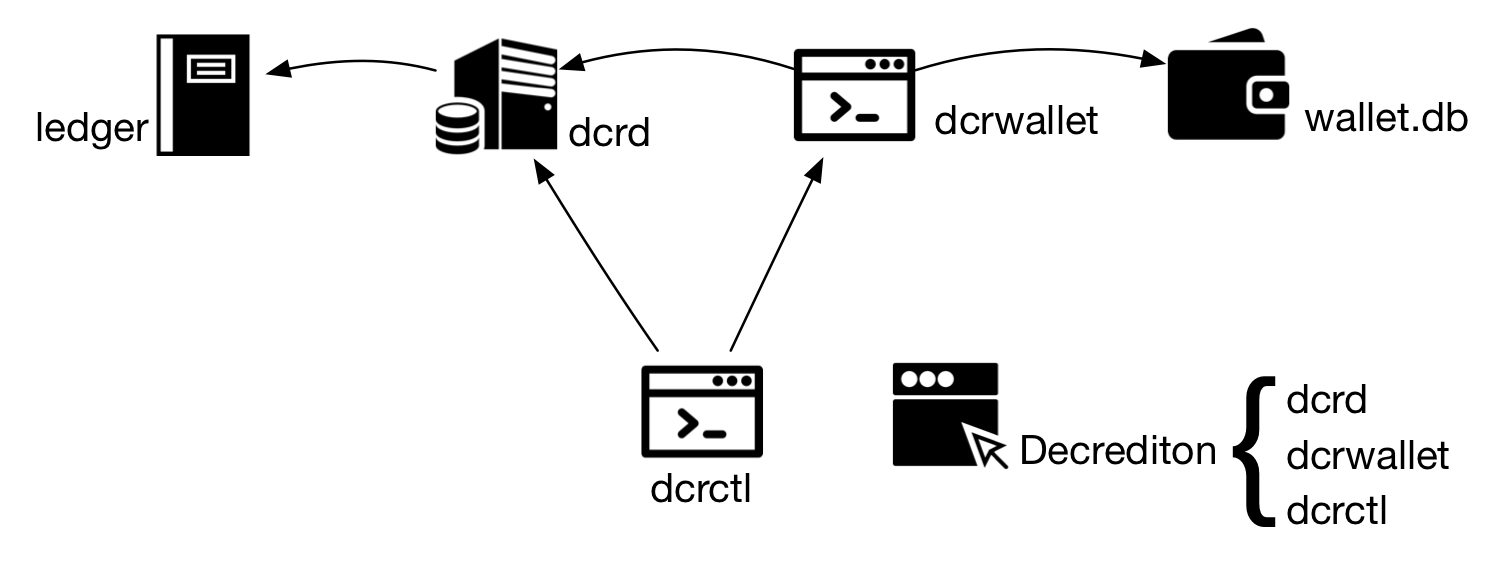
Figure 1 - Localhost access may not use digital certificates
When dcrd, dcrwallet, and Decrediton are started, they try to locate the private key (rpc.key) and the digital certificate (rpc.cert), which contains the public key. If they are not found, they will be automatically generated.
Learn more about asymmetric cryptography and digital certificates in A brief notion of cryptography.
2. Local communication Permalink
It is possible to start Decred components for local communication (on the same device) without encryption support. Command line options are:
$ ./dcrd --notls [--testnet]
$ ./dcrwallet --noservertls --noclienttls [--testnet]
$ ./dcrctl --notls [--testnet] [comando]
$ ./dcrctl --notls [--testnet] --wallet [comando]
3. Network communication Permalink
To allow a RPC client component (dcrwallet, dcrctl, and Decrediton) to connect to a RPC server component (dcrd, dcrwallet) on another host, you must copy the digital certificate from the RPC server to the RPC client.
In the following scheme, the certificates were copied between the hosts and the component name was prefixed in the file.
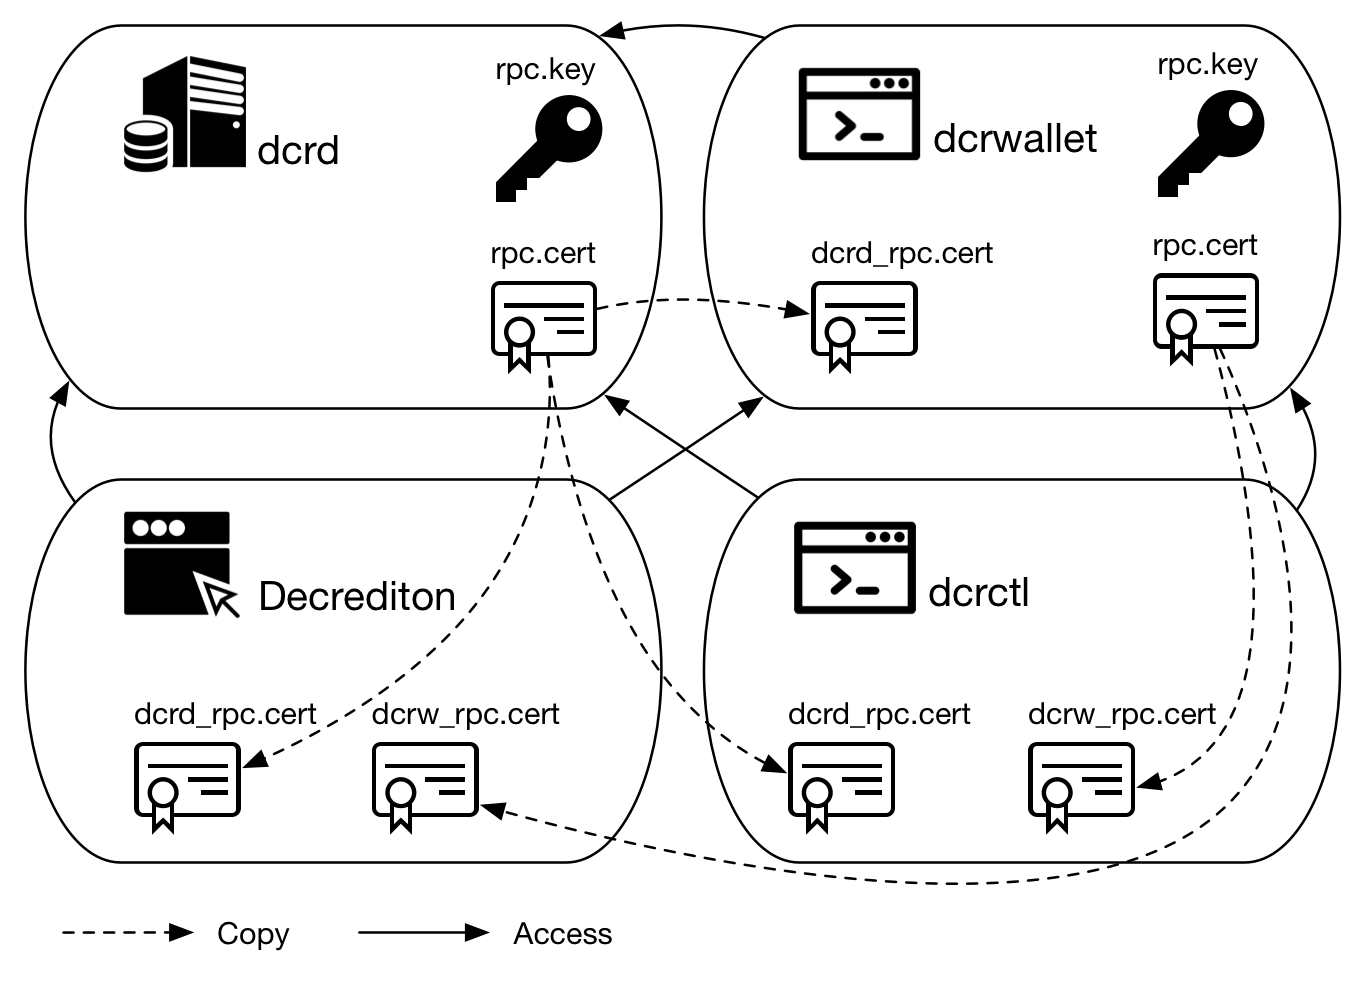
Figure 2 - Network connection depends on validating the certificate
Because these certificates are self-signed, they do not rely on a certification authority (CA) to validate them.
The certificates are generated with a X509v3 protocol extension, called Subject Alternative Name. This extension stores valid DNS names and IP addresses for the server in the certificate. So, if the server (dcrd or dcrwallet) has its name or IP address changed then another certificate must be generated and copied to its clients (dcrwallet, dcrctl and Decrediton).
For security reasons, when dcrd and dcrwallet are not being run on the same device, it is not recommended to use the same credentials (username and password) and the same digital certificate in dcrd and dcrwallet.
It is possible to create other scenarios, adapting the commands and parameters:
- dcrd and dcrwallet in one device; dcrclient in another;
- dcrd in one device; dcrwallet and dcrclient in another;
- dcrd and dcrclient in one device; dcrwallet in another;
3.1. Network communication examples Permalink
On lines 1 and 2, dcrd and dcrwallet act as servers and load their certificate and private key through --rpccert and --rpckey options. Still on line 2, dcrwallet also acts as client, as shown in figure 1, so it uses the --cafile option to indicate the dcrd certificate. On lines 3 and 4, dcrctl acts as the RPC client of the two components. Clients only indicate the server’s certificate in the --cafile option and do not use --rpclisten because they do not expect connections on any port.
$ ./dcrd --rpclisten=0.0.0.0 --rpccert=$DCRD_CERT --rpckey=$DCRD_KEY
$ ./dcrwallet --rpclisten=0.0.0.0 --rpccert=$DCRW_CERT --rpckey=$DCRW_KEY -c $DCRD_IP -u $DCRD_USER -P $DCRD_PASS --cafile=$DCRD_CERT
$ ./dcrctl -s $DCRD_IP -u $DCRD_USER -P $DCRD_PASS -c $DCRD_CERT [command]
$ ./dcrctl -w $DCRW_IP -u $DCRW_USER -P $DCRW_PASS -c $DCRW_CERT --wallet [command]
For Testnet, include --testnet option.
| PARAMETER | LOCATION |
|---|---|
| $DCRD_USER | rpcuser, on dcrd.conf |
| $DCRD_PASS | rpcpass, on dcrd.conf |
| $DCRD_CERT | Digital certificate (includes the public key). Set to rpc.cert by default. |
| $DCRD_KEY | Private key from the same pair of keys (digital certificate). Set to rpc.key by default. |
| $DCRD_IP | If rpclisten is 0.0.0.0, it corresponds to any IP address. For any other IP address, the parameter must use the IP address informed in rpclisten. |
| $DCRW_USER | username, on dcrwallet.conf |
| $DCRW_PASS | password, on dcrwallet.conf |
| $DCRW_CERT | Digital certificate (includes the public key). Set to rpc.cert by default. |
| $DCRW_KEY | Private key from the same pair of keys (digital certificate). Set to rpc.key by default. |
| $DCRW_IP | If rpclisten is 0.0.0.0, it corresponds to any IP address. For any other IP address, the parameter must use the IP address informed in rpclisten. |
4. Creating the digital certificate with OpenSSL Permalink
X509v3 digital certificates can be created using OpenSSL binaries installed on Linux. It may be useful for users who:
- need to change cryptographic methods or certificate expiration date, which by default is 3650 days, because of compliance issues;
- need to change the hostname or IP address;
- need to include more IP addresses or hostnames;
This section uses the next scenario depicted as an example for OpenSSL commands.
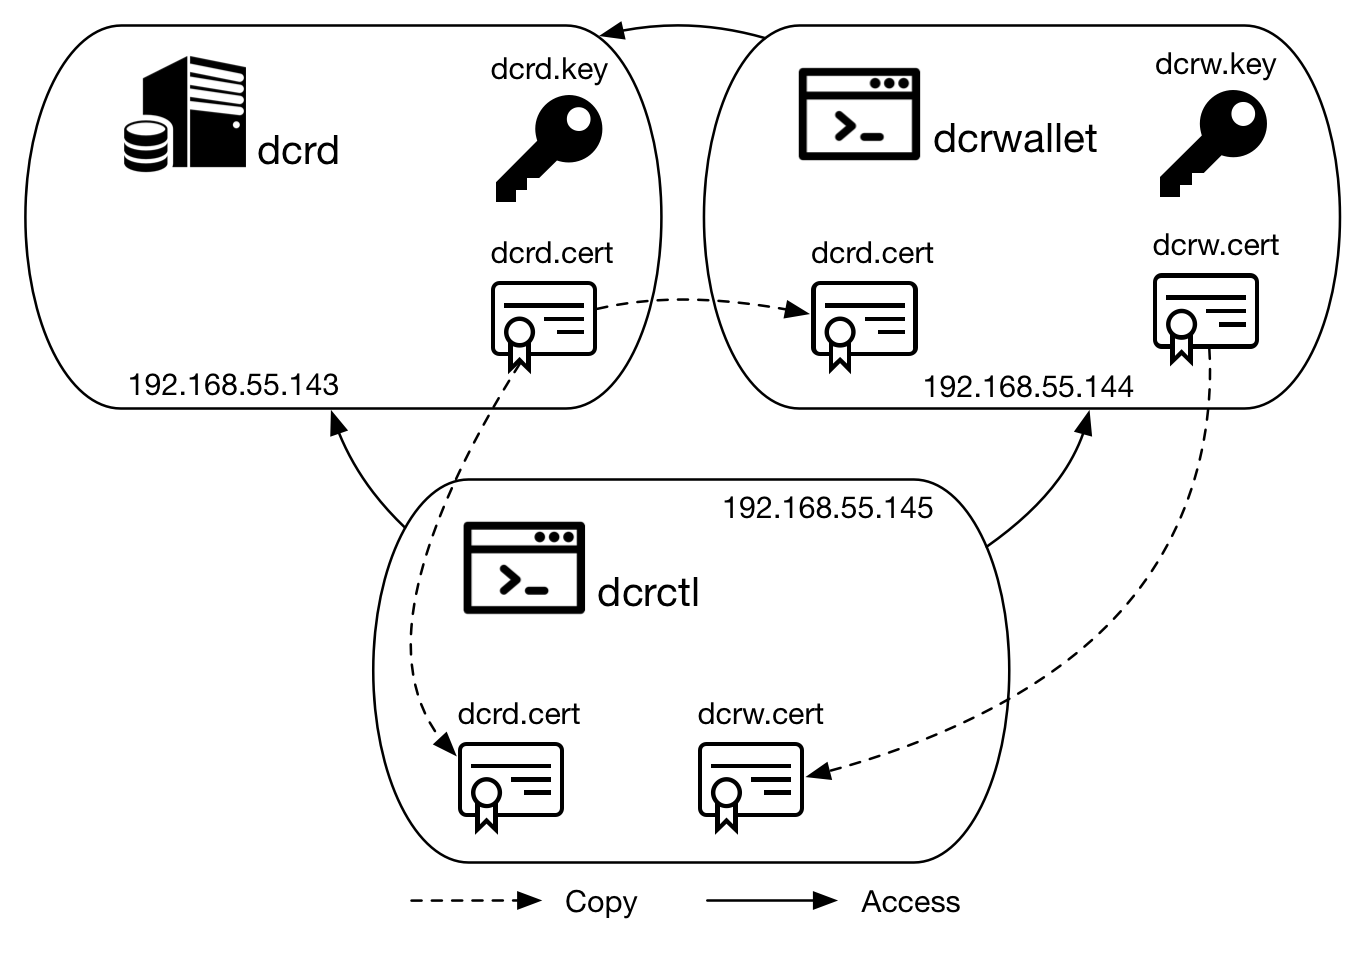
Figure 3 - Example scenario for OpenSSL
The following commands should be executed on the device that will run dcrd.
a) Create the ECDSA 521-bit private key. The name ‘dcrd’ will be used instead of ‘rpc’.
$ openssl ecparam -name secp521r1 -genkey -out dcrd.key
b) Make a copy of the default OpenSSL configuration file to include parameters for this certificate generation:
$ sudo cp /etc/ssl/openssl.cnf /etc/ssl/openssl-decred.cnf
c) Edit the file and search for the [req] section. Include the last line.
[req]
distinguished_name = req_distinguished_name
req_extensions = v3_req
d) Further, in the [v3_req] section, include the last line.
[v3_req]
# Extensions to add to a certificate request
basicConstraints = CA:FALSE
keyUsage = nonRepudiation, digitalSignature, keyEncipherment
subjectAltName = @alt_names
e) The last line in the previous snippet points to the section subjectAltName that does not yet exist. Copy and paste the next lines, with the appropriate changes according to your environment.
[alt_names]
DNS.1 = localhost
DNS.2 = fullnode
IP.1 = 127.0.0.1
IP.2 = 192.168.55.143
f) Create the certificate request (ssl.csr), using the private key (dcrd.key) previously generated, and the configuration file that was edited (openssl-decred.cnf).
$ openssl req -new -out dcrd.csr -key dcrd.key -config /etc/ssl/openssl-decred.cnf -subj "/CN=dcrd cert"
g) Output the certificate request to the screen to verify what will be signed.
$ openssl req -text -noout -in dcrd.csr
Certificate Request:
    Data:
        Version: 1 (0x0)
        Subject: CN = dcrd cert
        Subject Public Key Info:
            Public Key Algorithm: id-ecPublicKey
                Public-Key: (521 bit)
                pub:
                    04:01:3b:c4:dc:2f:54:1c:7b:96:a9:cb:f4:ef:81:
                    39:08:3d:8a:93:57:93:d5:6a:5c:35:38:b5:fd:6a:
                    8a:b5:e7:a2:21:cd:c6:a8:4d:4f:d9:a1:9d:cd:8e:
                    f1:e0:13:50:2e:6a:e1:80:ab:aa:97:53:89:84:b9:
                    2d:6d:3a:27:28:af:1d:00:aa:e8:39:29:ff:1d:33:
                    b7:14:0e:2f:2d:ab:ab:a5:3f:ef:db:13:b7:8c:ff:
                    2f:78:a3:b7:99:2c:7e:c1:c9:3f:5d:0b:ce:95:32:
                    dc:9f:b5:cb:4f:11:95:71:e1:a1:2d:3f:40:57:16:
                    28:40:17:20:67:1e:ff:87:66:c5:4a:5c:1c
                ASN1 OID: secp521r1
                NIST CURVE: P-521
        Attributes:
        Requested Extensions:
            X509v3 Basic Constraints:
                CA:FALSE
            X509v3 Key Usage:
                Digital Signature, Non Repudiation, Key Encipherment
            X509v3 Subject Alternative Name:
                DNS:localhost, DNS:fullnode, IP Address:127.0.0.1, IP Address:192.168.55.143
    Signature Algorithm: ecdsa-with-SHA256
         30:81:87:02:41:4e:e0:32:bc:cc:85:37:9f:5e:3d:57:5a:20:
         59:ee:4d:a9:b8:1a:2e:7f:36:84:1c:16:e9:cc:99:a2:06:23:
         99:33:98:ce:86:0a:22:23:4f:4c:eb:85:d9:d4:66:40:ca:59:
         af:24:4c:1f:b4:c0:c6:a4:b8:c3:7b:17:07:35:70:3c:02:42:
         01:07:41:6c:25:08:22:55:b2:61:5f:81:3f:78:84:c4:c8:04:
         28:d6:68:28:3c:b4:ee:1e:90:b8:bf:a4:8d:0b:57:51:10:cc:
         4d:97:71:63:e8:43:d7:54:12:9b:d3:b3:01:c4:6a:98:ac:74:
         17:5d:1e:3d:3e:66:40:d6:8b:71:e9:3d
The certificate request includes a data section, which contains information about the hierarchy, the public key, other attributes such as key usage (digital signature, non-repudiation, and key exchange) and the valid hostnames and IP addresses allowed for this certificate and the digital signature of the certificate request. This information was shown in the code snippet before this paragraph and in the scheme depicted in the next figure.
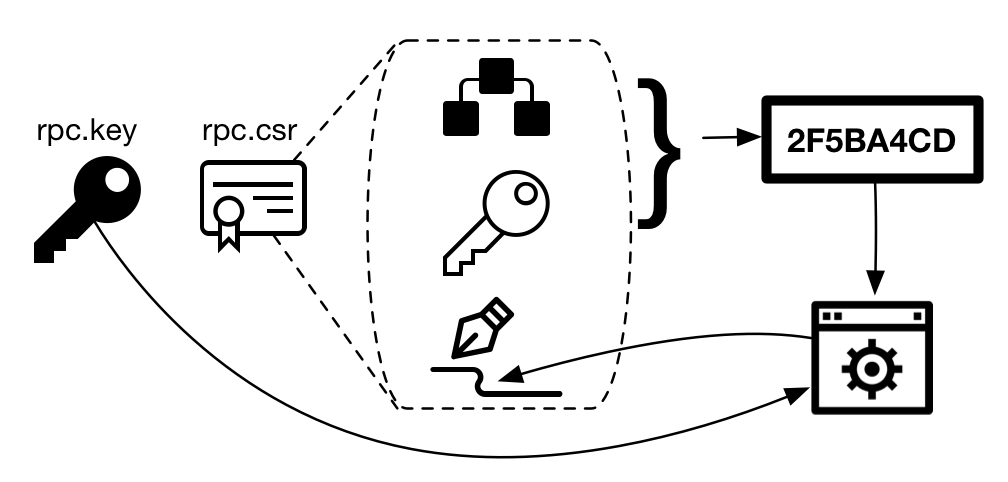
Figure 4 - Signed certificate request creation
The process of certificate creation generates a hash of the hierarchy information, public key, attributes, and extensions. The certificate request signature is not used.
In a self-signed certificate the hash is signed with the private key from the pair. For certificates that are part of a hierarchical chain, the hash is signed with the CA’s private key (Certification Authority), which is the trusted entity (trusted in the sense that other users already trust their digital certificate - it’s already installed).
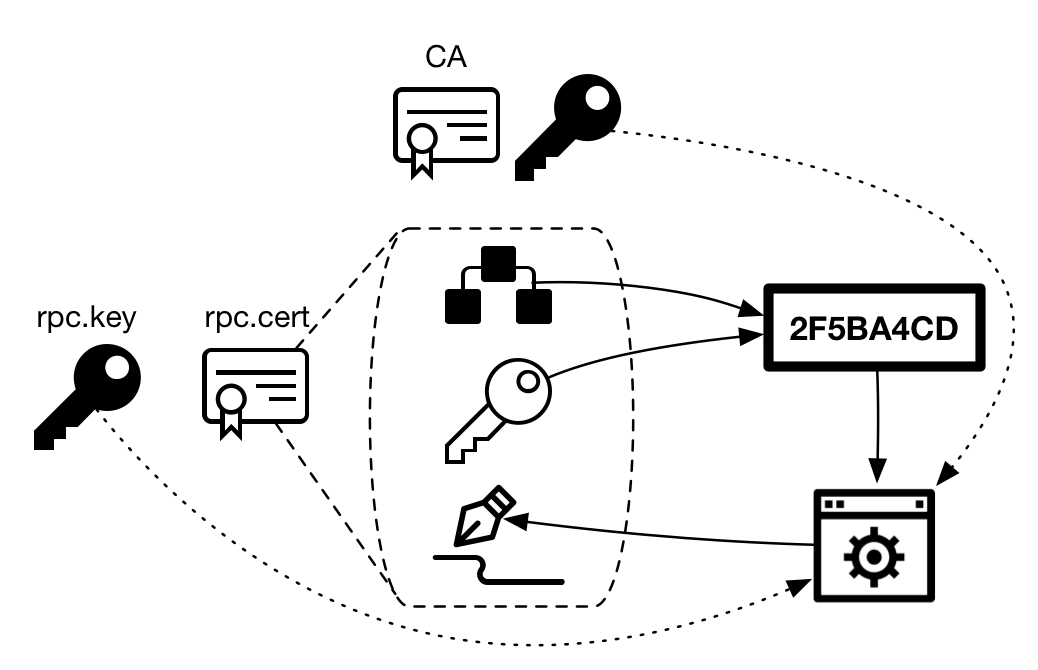
Figure 5 - The certificate will be self-signed or signed by the CA
h) If all information is correct, create the self-signed certificate. Note the -signkey option, which points to the key dcrd.key created in step a) to sign the certificate dcrd.cert.
$ openssl x509 -req -days 3650 -in dcrd.csr -signkey dcrd.key -out dcrd.cert -extensions v3_req -extfile /etc/ssl/openssl-decred.cnf
Signature ok
subject=CN = dcrd cert
Getting Private key
i) Output the information to the screen to verify the signed certificate.
$ openssl x509 -text -in dcrd.cert
Certificate:
    Data:
        Version: 3 (0x2)
        Serial Number:
            cb:24:66:90:57:e7:92:8b
    Signature Algorithm: ecdsa-with-SHA256
        Issuer: CN = dcrd cert
        Validity
            Not Before: Mar 29 23:32:56 2018 GMT
            Not After : Mar 26 23:32:56 2028 GMT
        Subject: CN = dcrd cert
        Subject Public Key Info:
            Public Key Algorithm: id-ecPublicKey
                Public-Key: (521 bit)
                pub:
                    04:01:3b:c4:dc:2f:54:1c:7b:96:a9:cb:f4:ef:81:
                    39:08:3d:8a:93:57:93:d5:6a:5c:35:38:b5:fd:6a:
                    8a:b5:e7:a2:21:cd:c6:a8:4d:4f:d9:a1:9d:cd:8e:
                    f1:e0:13:50:2e:6a:e1:80:ab:aa:97:53:89:84:b9:
                    2d:6d:3a:27:28:af:1d:00:aa:e8:39:29:ff:1d:33:
                    b7:14:0e:2f:2d:ab:ab:a5:3f:ef:db:13:b7:8c:ff:
                    2f:78:a3:b7:99:2c:7e:c1:c9:3f:5d:0b:ce:95:32:
                    dc:9f:b5:cb:4f:11:95:71:e1:a1:2d:3f:40:57:16:
                    28:40:17:20:67:1e:ff:87:66:c5:4a:5c:1c
                ASN1 OID: secp521r1
                NIST CURVE: P-521
        X509v3 extensions:
            X509v3 Basic Constraints:
                CA:FALSE
            X509v3 Key Usage:
                Digital Signature, Non Repudiation, Key Encipherment
            X509v3 Subject Alternative Name:
                DNS:localhost, DNS:fullnode, IP Address:127.0.0.1, IP Address:192.168.55.143
    Signature Algorithm: ecdsa-with-SHA256
         30:81:88:02:42:01:89:e9:75:a2:92:7e:83:a2:10:06:1a:17:
         0e:7c:40:b6:bc:05:11:a1:f7:c0:9c:4d:5b:0b:5a:84:d8:e8:
         d2:9d:49:60:63:43:54:5f:cc:dd:d6:47:1d:92:7b:53:14:a7:
         d2:d2:d9:f0:3d:2c:04:b7:80:96:5c:a3:6d:da:c2:81:a9:02:
         42:00:ed:d4:65:40:d0:2f:27:87:4f:61:f0:d5:f4:5d:be:82:
         9c:01:a0:db:ff:14:3c:d0:1f:3e:4f:20:9d:27:ae:e0:3b:9b:
         50:4c:84:2f:b8:0f:34:d9:2c:23:04:1e:c6:5b:d1:19:a6:3c:
         9d:79:3a:08:8f:d8:f3:a2:02:8f:3b:94:c6
-----BEGIN CERTIFICATE-----
MIIB7TCCAU6gAwIBAgIJAMskZpBX55KLMAoGCCqGSM49BAMCMBQxEjAQBgNVBAMM
CWRjcmQgY2VydDAeFw0xODAzMjkyMzMyNTZaFw0yODAzMjYyMzMyNTZaMBQxEjAQ
BgNVBAMMCWRjcmQgY2VydDCBmzAQBgcqhkjOPQIBBgUrgQQAIwOBhgAEATvE3C9U
HHuWqcv074E5CD2Kk1eT1WpcNTi1/WqKteeiIc3GqE1P2aGdzY7x4BNQLmrhgKuq
l1OJhLktbTonKK8dAKroOSn/HTO3FA4vLaurpT/v2xO3jP8veKO3mSx+wck/XQvO
lTLcn7XLTxGVceGhLT9AVxYoQBcgZx7/h2bFSlwco0YwRDAJBgNVHRMEAjAAMAsG
A1UdDwQEAwIF4DAqBgNVHREEIzAhgglsb2NhbGhvc3SCCGZ1bGxub2RlhwR/AAAB
hwTAqDePMAoGCCqGSM49BAMCA4GMADCBiAJCAYnpdaKSfoOiEAYaFw58QLa8BRGh
98CcTVsLWoTY6NKdSWBjQ1RfzN3WRx2Se1MUp9LS2fA9LAS3gJZco23awoGpAkIA
7dRlQNAvJ4dPYfDV9F2+gpwBoNv/FDzQHz5PIJ0nruA7m1BMhC+4DzTZLCMEHsZb
0RmmPJ15OgiP2POiAo87lMY=
-----END CERTIFICATE-----
Repeat the commands (except for the openssl.cnf part if dcrwallet will run on the same device) to create dcrw.cert and dcrw.key files. Copy the files as shown in figure 3 and replace the filenames on the command line:
$ ./dcrd --rpclisten=192.168.55.143 --rpccert=dcrd.cert --rpckey=dcrd.key
$ ./dcrwallet --rpclisten=192.168.55.144 --rpccert=dcrw.cert --rpckey=dcrw.key -c 192.168.55.143 -u $DCRD_USER -P $DCRD_PASS --cafile=dcrd.cert
$ ./dcrctl -s 192.168.55.143 -u $DCRD_USER -P $DCRD_PASS -c dcrd.cert [command]
$ ./dcrctl -w 192.168.55.144 -u $DCRW_USER -P $DCRW_PASS -c dcrw.cert --wallet [command]


Comments ()